The Exposure Triangle for Cinematographers (Why It Works Differently Than in Photography)
The First Thing Photographers Get Wrong in Video
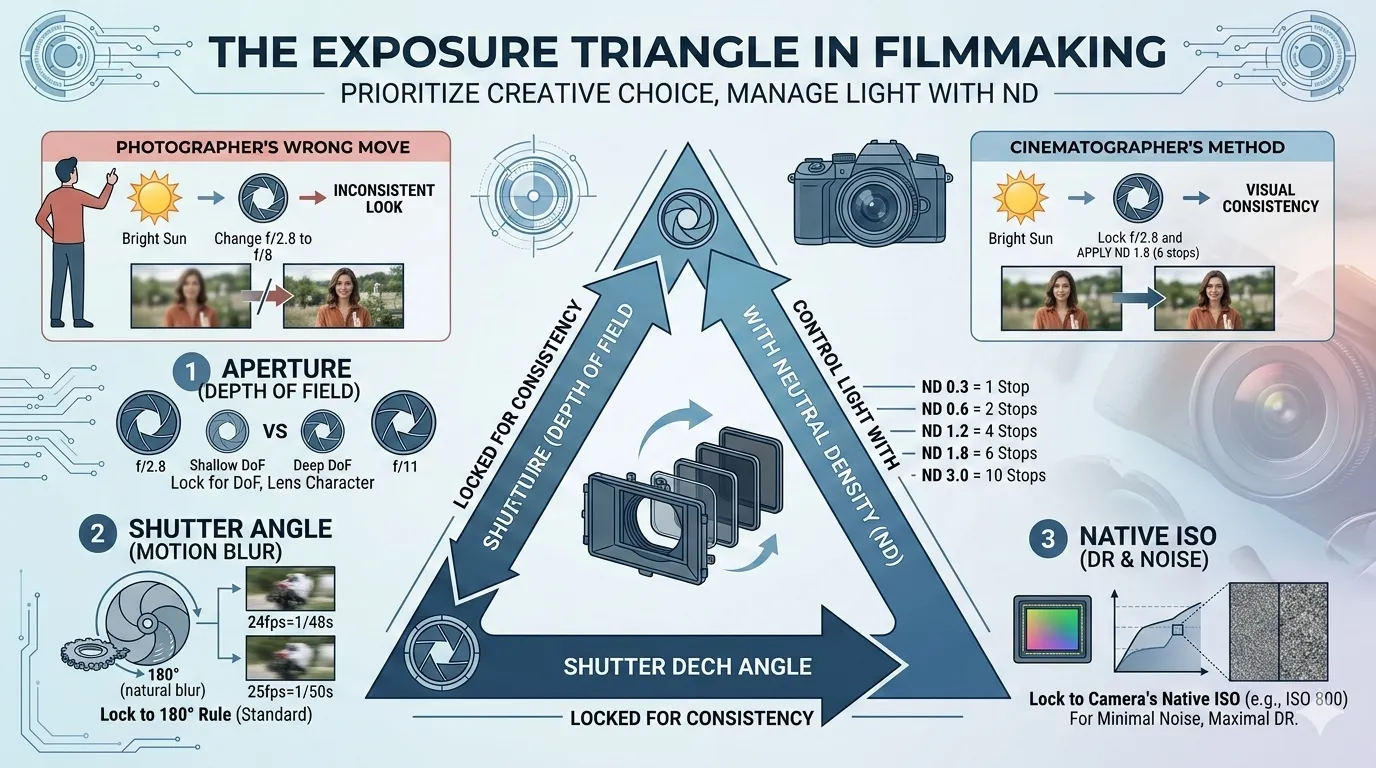
You hand a photographer a cinema camera and they immediately reach for the shutter speed. They set 1/50s for 25fps -- correct. They know the 180-degree rule. They nail the exposure. Then the director asks for a wider shot in bright sun, and the photographer stops down to f/8. The shot looks exactly right on the monitor. Everyone moves on.
Two hours later in editing, the colorist flags the footage: the shots at f/2.8 and f/8 cut together with visible background separation differences. The look of the film has changed. The photographer fixed the exposure correctly but violated the visual consistency of the film by adjusting aperture to control light.
In cinematography, aperture is locked for creative reasons -- depth of field, lens character, optical performance sweet spot. Exposure in bright conditions is managed with ND filters, not with aperture. Shutter angle is locked for motion blur reasons. ISO is set at native for noise reasons. The exposure triangle still operates on the same physical principles as in photography, but the tools you reach for -- and the ones you protect -- are entirely different.
This post explains the exposure triangle as it actually works for cinematographers: shutter angle, ND filtration, and native ISO as a system for managing light while preserving the image you designed in pre-production.
The shutter angle relationship and EV system referenced here are defined in the ASC Manual, 10th Edition, and the exposure value formula standardized in ISO 2720.
How Shutter Angle and Shutter Speed Relate
In motion picture tradition, shutter speed is expressed as a shutter angle -- a fraction of a full 360-degree rotation of the camera's mechanical shutter disc. At 24fps, the camera runs 24 complete rotations per second. A 180-degree shutter means the shutter is open for half of each rotation, giving an exposure time of 1/(2 x 24) = 1/48 second.
The conversion formula:
Shutter Speed = 1 / (Frame Rate x (360 / Shutter Angle))For a 180-degree shutter at 24fps: 1 / (24 x 2) = 1/48s.
For a 180-degree shutter at 25fps: 1 / (25 x 2) = 1/50s.
For a 180-degree shutter at 48fps: 1 / (48 x 2) = 1/96s.
The 180-degree rule is the cinema standard for natural-looking motion blur. At 180 degrees, moving subjects produce motion blur that matches the persistence of vision response of the human eye to the corresponding frame rate. This is why 24fps at 1/48s feels like "film" -- the motion blur duration is calibrated to the frame rate in a way that the brain accepts as natural continuous motion.
Shutter angles below 90 degrees produce freeze-frame staccato motion (the Saving Private Ryan opening sequence deliberately used 45-degree shutter). Shutter angles above 270 degrees produce smeared, dream-like motion blur. Both are creative tools; neither is wrong. The 180-degree rule is a default, not a mandate.
The 12 Frame Rate Shutter Angle Conversion Table
The table below shows the shutter speed equivalents for the four most common shutter angles at 12 standard frame rates. All values are calculated using the shutter angle formula above.
| Frame Rate | 90° | 172.8° | 180° | 270° |
|---|---|---|---|---|
| 23.976fps | 1/48s | 1/25s | 1/48s | 1/32s |
| 24fps | 1/96s | 1/50s | 1/48s | 1/32s |
| 25fps | 1/100s | 1/51s | 1/50s | 1/33s |
| 29.97fps | 1/120s | 1/62s | 1/60s | 1/40s |
| 30fps | 1/120s | 1/62s | 1/60s | 1/40s |
| 48fps | 1/192s | 1/100s | 1/96s | 1/64s |
| 50fps | 1/200s | 1/104s | 1/100s | 1/67s |
| 59.94fps | 1/240s | 1/125s | 1/120s | 1/80s |
| 60fps | 1/240s | 1/125s | 1/120s | 1/80s |
| 100fps | 1/400s | 1/208s | 1/200s | 1/133s |
| 120fps | 1/480s | 1/249s | 1/240s | 1/160s |
| 240fps | 1/960s | 1/497s | 1/480s | 1/320s |
The 172.8-degree shutter angle column is included because it eliminates flicker from fluorescent and LED fixtures running on 50Hz power supplies (common in Europe and the UK). At 25fps with 172.8-degree shutter, the exposure time is 1/51.4s, which falls within the flicker-safe tolerance for 50Hz sources. For North American 60Hz locations, use 1/60s or 1/120s shutter speeds for flicker-free results.
Three Production Scenarios Using the Full Exposure System
Example 1: Narrative Exterior in Midday Sun, Sony FX3
A narrative short shooting a dialogue scene on a rooftop at 12:00 PM, harsh sun. Camera: Sony FX3 at native ISO 800, 24fps, 180-degree shutter (1/48s). The DP's chosen aperture for the scene is f/2.8 for DoF matching with interiors. Incident meter reading in full sun at ISO 800, 1/48s: f/22. That's a 6-stop overexposure at the desired aperture. Solution: 6-stop ND filter (ND 1.8, also written as ND 64). With 6 stops of ND, the exposure equation balances at f/2.8, ISO 800, 1/48s. No aperture change. No ISO change. No shutter change. The Exposure Calculator confirms the ND selection in seconds. The DP confirmed this ND requirement in the morning before the setup, giving the grip time to cut the correct filter.
Example 2: Documentary Interview Transition From Interior to Exterior
A documentary DP shooting a single-person interview that begins indoors and continues as the subject walks out into bright daylight. Camera: Canon EOS C70, ISO 800, 25fps, 180-degree shutter (1/50s), aperture f/4. Interior exposure is balanced. On the walk outside, the light increases by approximately 5 stops. Options: change aperture to f/22 (destroys the shallow DoF and lens rendering established inside), raise shutter to 1/1600s (destroys the 180-degree motion blur rhythm), or apply a variable ND filter that transitions from ND 0 inside to ND 5 outside. A variable ND (Tiffen Variable ND, 2-8 stop range) was used at the appropriate setting for the light transition, maintaining aperture, ISO, and shutter throughout. The Exposure Calculator was used to precheck the ND range required for the transition before the interview.
Example 3: Music Video Slow Motion, ARRI ALEXA Mini at 120fps
A music video director planning a 120fps slow-motion sequence at midday. Camera: ARRI ALEXA Mini, ISO 800. At 120fps with 180-degree shutter, the shutter speed is 1/240s. Incident meter reads f/22 equivalent. The DP's intended aperture for the slow-motion sequence is f/4 for a distinct, cinematic DoF look. That's a 5-stop gap (f/4 to f/22 = 5 stops). ND required: 5 stops (ND 1.5 / ND 32). Slow-motion sequences also require significantly more light than standard frame rate shots -- at 120fps, the sensor spends 5x less time exposed per frame than at 24fps, which is a 2.3-stop light penalty even before ND is applied. Using the Exposure Calculator confirmed the total ND requirement at 120fps: native exposure at ISO 800, f/4, 1/240s was 8 stops under the scene brightness, requiring ND 3.0 to bring exposure to balance.
How to Use the Exposure Triangle in Practice
Step 1: Lock your frame rate based on creative and delivery requirements. 24fps for cinematic fiction, 25fps for European broadcast, 29.97fps for North American broadcast, overcranked (48fps or higher) for planned slow-motion.
Step 2: Set your shutter angle. Default is 180 degrees for natural motion blur. Adjust deliberately if the scene calls for it: tighter shutter for sharper action (sports, stunts), longer shutter for dreamlike blur.
Step 3: Set your ISO to the camera's native ISO (or the appropriate dual-native if shooting low light). Lock it here for the scene unless lighting conditions require a deliberate change.
Step 4: Choose your aperture based on the depth of field and optical performance requirements of the shot. Lock this aperture for the scene. Use the Depth of Field Calculator to confirm the DoF at your chosen aperture before committing.
Step 5: Use the Exposure Calculator to determine what ND filtration is needed to bring the scene to correct exposure at your locked aperture, ISO, and shutter angle. This is the variable you adjust for changing light conditions, not the other three.
Step 6: For interiors where light levels change between setups (different practical fixtures, day vs. evening practicals), adjust practical light levels rather than camera settings to maintain consistent exposure across the scene. Camera settings that stay consistent across a scene produce more consistent, gradable footage.
Pro Tips and Common Mistakes
Pro Tip: Variable ND filters (Tiffen, PolarPro, Formatt Hitech) are practical for run-and-gun work but introduce two problems at extremes. At minimum ND, they can produce an x-pattern of uneven light transmission. At maximum ND, they can introduce color shifts toward magenta or green. Before relying on a variable ND on a production, test your specific unit at various settings with a grey card and check for color casts. Fixed ND filters are color-neutral; variable NDs introduce some optical compromise.
Pro Tip: The EV system quantifies total scene luminance as a single number and allows fast exposure decisions without working through aperture, shutter, and ISO separately. EV 0 is defined as f/1.0, 1-second exposure, ISO 100. Each additional EV corresponds to halving the light (or one stop). A sunny day scene is approximately EV 15. At native ISO 800 and 1/48s shutter, the exposure equation at EV 15 gives f/11 -- meaning you need ND filtration to achieve f/2.8. The Exposure Calculator uses this EV framework internally.
Pro Tip: At very high frame rates (120fps+), standard LED panel lighting can introduce flicker because the LED refresh cycle interacts with the fast shutter speed. LEDs running at 50Hz or 60Hz can flicker at frame rates that don't divide evenly into the power supply frequency. Confirm flicker-free status at your intended high frame rate by shooting a test before the production day. High-frequency LED drivers (typically 1000Hz+) eliminate this problem. Tungsten and HMI lights with electronic ballasts are largely flicker-free at normal frame rates.
Common Mistake: Treating the 180-degree rule as absolute law rather than a default. The 180-degree rule produces motion blur that matches the viewer's natural perception at the corresponding frame rate. Departing from 180 degrees deliberately is a creative choice with a specific visual result -- Saving Private Ryan, Uncut Gems, and certain commercial genres intentionally use tighter shutters for a more visceral, sharp-action aesthetic. The mistake is departing from 180 degrees accidentally (by adjusting shutter to control exposure) and not noticing the visual inconsistency until the edit.
The fix: Never adjust shutter speed to control exposure in narrative or commercial work. Use ND filters. Reserve shutter angle adjustment for deliberate creative decisions, and note those decisions on the camera report so the colorist and editor understand the intent.
Common Mistake: Assuming that the exposure triangle in video means ISO, aperture, and shutter speed can all be adjusted freely, the same as in photography. In cinema, aperture controls DoF (locked for scene consistency), shutter angle controls motion blur (locked to the 180-degree standard), and ISO is locked to native. The only freely adjustable element for changing light conditions is ND filtration. Photographers who don't internalize this distinction will instinctively reach for aperture when the light changes, which is wrong for narrative filmmaking.
The fix: Physically remove aperture adjustment from your reflexive response. When light changes on a narrative shoot, the only question is: what ND filter do I need? Use the Exposure Calculator to answer that question quickly.
Frequently Asked Questions
Why is 180-degree shutter angle the standard?
The 180-degree rule produces a shutter speed of 1/(2 x frame rate), which exposes each frame for exactly half the total frame period. This results in motion blur that the human visual system interprets as consistent with the natural perception of motion at the given frame rate. The standard was established during the mechanical film camera era when a rotating disc shutter was physically limited to 180 degrees maximum by the film advance mechanism, and that visual standard became the perceptual reference for "film look" that digital cinema preserved.
What's the difference between ND 0.3, ND 6, and ND64?
ND filters are labeled in three different systems that measure the same thing: ND 0.3 = ND2 = 1 stop. ND 0.6 = ND4 = 2 stops. ND 0.9 = ND8 = 3 stops. ND 1.2 = ND16 = 4 stops. ND 1.5 = ND32 = 5 stops. ND 1.8 = ND64 = 6 stops. ND 2.1 = ND128 = 7 stops. ND 3.0 = ND1000 = 10 stops. The "ND 0.3" format is optical density notation; "ND2" is the filter factor; "1 stop" is the photographic stop equivalent. Camera monitor apps and the Exposure Calculator typically use stop equivalents, which are the most operationally intuitive.
How does ISO affect the exposure triangle differently in cinema than in photography?
In photography, ISO is adjusted continuously to manage exposure alongside aperture and shutter speed. In cinema, ISO is treated as fixed at the camera's native ISO for a given setup, because non-native ISO adds amplification that changes shadow noise character and can reduce dynamic range. When a DP says "I'm shooting ISO 800," they usually mean this is the fixed ISO for the project or the scene, and light management happens through ND filters and fixture placement. The flexibility photographers expect from ISO adjustment is replaced by ND filter depth in professional video production.
What is ETTR in video and is it valid?
ETTR (Expose to the Right) means exposing as bright as possible without clipping highlights, to maximize signal-to-noise ratio in shadows. It works in video but with constraints. On cameras recording at 10 or 12 bits, ETTR genuinely improves shadow quality. On 8-bit recordings, highlight headroom is too limited for the technique to be reliable. For LOG recordings, the ETTR principle means exposing about 1-2 stops brighter than the metered exposure while monitoring the LOG waveform to confirm no clipping in the LOG curve's highlight region. The Exposure Calculator includes the EV math needed to quantify an ETTR offset from metered exposure.
Can I use a higher shutter angle than 180 degrees?
Yes. A 270-degree shutter angle at 24fps gives a shutter speed of 1/32s -- a longer exposure that creates more motion blur per frame. This is used deliberately for dream sequences, disorienting visual effects, or stylized action where the viewer should feel temporal unease. The maximum practical shutter angle on most digital cinema cameras is 360 degrees (full open), though at 360 degrees the sensor is essentially integrating light continuously. Above 180 degrees, motion will always look "slower" and more blurred than the audience expects from the frame rate, which can be either a problem or a creative tool depending on the scene.
Related Tools
The Exposure Calculator handles shutter angle to shutter speed conversions, EV calculations, and ND filter recommendations simultaneously. For the depth of field implications of every aperture decision covered here, Depth of Field in Cinema covers the full optical system.
For ISO decisions at the native and dual-native ISO points, ISO, Noise, and When to Push Your Camera provides the sensor science behind maintaining ISO discipline. For slow-motion frame rate decisions and the additional exposure considerations they introduce, Frame Rates in Filmmaking covers the full frame rate system including slow-motion and high-frame-rate aesthetics.
Lock Three, Control One
The exposure triangle in cinematography is a discipline of constraints. Three of the four exposure variables -- aperture, shutter angle, ISO -- are locked to their creatively and technically correct positions. The fourth, ND filtration, is the adjustment tool. Photographers who learn this constraint don't lose creative freedom -- they gain a more deliberate image, because every element of the exposure system is serving the image rather than responding to the available light.
What's the most extreme ND filtration you've used on a production, and what were the shooting conditions that required it?

